
【Unity】VirtualJoystickの実装について
VirtualJoystickの実装について
スマートディバイス(ios Android)でのGameでは、標準ではGamePadが使えませんので、画面上に仮想のGamePadを表示します。
今回は、仮想のGamePadの実装方法について考えてみます。
目標
1.すばやく 2.簡単に 3.見た目のカストマイズも一瞬で
はい。むちゃな要求ですが、ありきたりの機能です。当然 できんだろとw
お金持ちの結論
目的を達成するためには、買うのが早いです。さまざまなAssetはあります。自分は、下記の2つを利用しています。

利点
安価な比較的ローコストで使えます。
実装もサンプルを少し弄れば簡単にできます。
欠点
お金かかるじゃんwwww
見た目のカストマイズは必要。習得に時間がかかる。
自分の結論
上記2つを試した結果、なんだかんだで作った方がいいじゃんw と自作しました。
動的にポジションを変えるなどの機能は未対応です。今後、必要になったら追加しますね。
作り方
完成形はこんな感じ
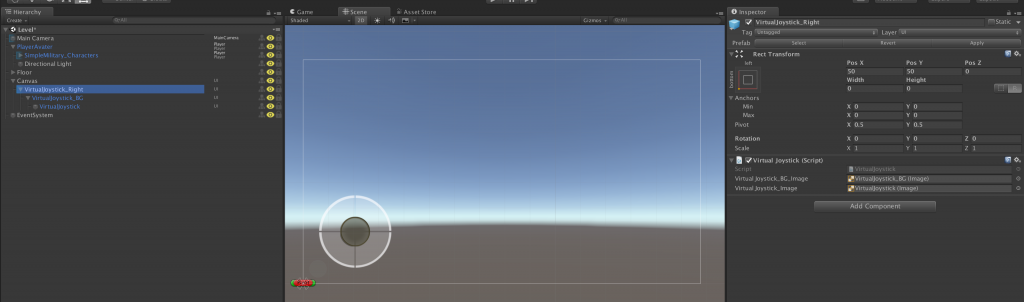
Virtual Controlで利用するイメージを準備します。
VirtualJoystick_BG
![]()
VirtualJoystick_BGの子に可動部分を設定します。

サンプルソース
using UnityEngine;
using UnityEngine.UI;
using UnityEngine.EventSystems;
using System.Collections;
public class VirtualJoystick : MonoBehaviour, IDragHandler, IPointerUpHandler, IPointerDownHandler
{
public Image virtualJoystick_BG_Image;
public Image virtualJoystick_Image;
public Vector3 inputDirection{ set ; get ; }
private float x;
private float y;
private void Start()
{
//virtualJoystick_BG_Image = GetComponentsInChildren ();
//virtualJoystick_Image = GetComponentsInChildren ();
inputDirection = Vector3.zero;
}
public virtual void OnDrag(PointerEventData ped)
{
//Debug.Log ("OnDrag");
Vector2 pos = Vector2.zero;
if (RectTransformUtility.ScreenPointToLocalPointInRectangle (virtualJoystick_BG_Image.rectTransform, ped.position, ped.pressEventCamera, out pos))
{
pos.x = (pos.x / virtualJoystick_BG_Image.rectTransform.sizeDelta.x);
pos.y = (pos.y / virtualJoystick_BG_Image.rectTransform.sizeDelta.y);
x = (virtualJoystick_BG_Image.rectTransform.pivot.x == 1) ? x = pos.x * 2 + 1 : x = pos.x * 2 - 1;
y = (virtualJoystick_BG_Image.rectTransform.pivot.y == 1) ? y = pos.y * 2 + 1 : y = pos.y * 2 - 1;
inputDirection = new Vector3 (x, 0, y);
if (inputDirection.magnitude > 1) {
inputDirection = inputDirection.normalized;
}
virtualJoystick_Image.rectTransform.anchoredPosition = new Vector3 (InputDirection.x * (virtualJoystick_BG_Image.rectTransform.sizeDelta.x / 3)
, inputDirection.z * (virtualJoystick_BG_Image.rectTransform.sizeDelta.y / 3));
}
}
public virtual void OnPointerDown(PointerEventData ped)
{
OnDrag (ped);
}
public virtual void OnPointerUp(PointerEventData ped)
{
inputDirection = Vector3.zero;
virtualJoystick_Image.rectTransform.anchoredPosition = Vector3.zero;
}
}
次に使い方です。
inputDirectionに結果が格納されてますので、下記のように利用します。
public class PlayerCharactorController : MonoBehaviour
{
public VirtualJoystick virtualJoystick_Right;
void Update ()
{
Vector3 charactormove = Vector3.zero;
charactormove.x = Input.GetAxis ("Horizontal");
charactormove.z = Input.GetAxis ("Vertical");
if (virtualJoystick_Right.InputDirection != Vector3.zero)
{
charactormove = virtualJoystick_Right.InputDirection;
}
}
}
機能拡張もすぐにできると思います。
参考にしたyoutubeです。ほぼこのまま実装してますがw